
Got home from Parker's and with the time change and mimosas, passed tf out at 2000 hours after a hot shower, sleeping 8-hours, awaking once.
Dreamed Dorian's little yellow car was a very early model Esprit...with gulwing doors. It was a lot of fun to drive (and I had a few close calls) but that didn't seem to bother Dorian who was in the passenger seat. Both kids were in the back. It didn't dawn on me until I awoke that the Esprit didn't have back seats. All four of us were having a nice time, but of course there was the usual maze of shopping malls and strip malls, narrow streets in which to navigate in the Lotus, and heavy, closed double-doors in which to first open before I could drive through.
Second dream I was at the plant, but it was less cubicles and more open workspaces. At one point an acquaintance had found a couple of SGI Indigo 2 workstations which had been retired. I got one and he got the other. I was thrilled to install an operating system on them. At first I was going to install Irix, but then decided Slackware would be a better option, able to utilize the older hardware. His was brand new and unused. When we cracked the case to see what was inside, we discovered none of the internal components were even connected - they were still in their clear plastic bags. I told him I would help him as he was a Windows admin and had no experience with building out unix systems. I was hoping he wasn't planning on installing Windows on the box.

# cat /etc/hosts | grep backendNAS
192.168.0.3
# for x in {4..62} ; do echo "192.168.0.$x backendNAS" >> /etc/roundrobin_nas
# chmod 644 /etc/roundrobin_nas
# cat /etc/dnsmasq.conf | grep addn-hosts
addn-hosts=/etc/roundrobin_nas
# systemctl restart dnsmasq
# nslookup backendNAS
Name: backendNAS
IP: 192.168.1.3
Name: backendNAS
IP: 192.168.1.4
Name: backendNAS
IP: 192.168.1.5
...
Name: backendNAS
IP: 192.168.1.60
Name: backendNAS
IP: 192.168.1.61
Name: backendNAS
IP: 192.168.1.62


As a UNIX guy I often fail to consider that not everything which utilizes point & click is automatically intuitive. Configurability's Achillies heel is in its complexity, and VMware's vast suite of tools is infinitely configurable. Hello intricacy! I've been running ESXi for longer than I can count using both hands, but never as an Enterprise-level VMware administrator - while I am aware of its daunting challenges, there's nothing quite like being thrust into unfamiliar territory for humble clarification.
I was dismayed vSAN didn't easily and automatically configure itself based upon a series of guesswork, mild interest, and median effort, but that's on me. So instead of sleeping last night, I fired up our employer-provided learning site and began watching technical training videos. Somewhere between the philosophy surrounding its use and the technical howto, I mused on how rote this all would be if I could simply virtualize vSphere itself to create a lab-within-a-lab, free from impacting the very platform on which I was standing in order to test. As you may have already surmised, these thoughts quickly turned from fanciful, to obsessive.
Those of you who are already familiar with this course of action may be confused how I could get "routine" from adding additional layers of configuration into an already complex environment, but that's not necessarily how us stereotypically lazy UNIX administrators operate; we vacillate between brilliant creativity in engineering an over-the-top solution for even the simplest problem, to orchestrating incomprehensibly bare-minimum solutions to otherwise sticky problems completely dependent upon our level of interest in the project at hand, and this had assuredly caught my attention.
In the annals of my blog I oft repeat how I embrace the RTFM-only-as-a-last-resort school of thought, so once again I winged it, albeit this time with increasing interest and above-average (for me) effort. I'm running three (3) vSphere 6.7u3 servers as virtual machines, with vCenter 7.0.3 as one of their virtual machines in an elegant display reminiscent of nested Matryoshka dolls and finished nesting their respective discrete virtual switches. I still don't entirely know what I'm doing, but it sure is a lot of fun.


Find the Hog
If your users keep using up all the space in your home directory, here is a way to apprehend the top offenders.
cd /home
du -ks *|sort -nr|pg
(Note: The "k" option may not be necessary in non-posix systems.)
This string will show you all the directory sizes in order, largest first. Now if you are going to do a little cleanup yourself, in one of those directories run:
ls -ls|sort -nr|pg
This will list files by size largest first. That way when you do your compress, move, or remove, you may actually reclaim a significant amount of space.

Back in the day we had just about every fantasy, comic book, and sci-fi fandom covered in our server naming conventions; more often than not clashing when they let us - the system administrators - name the data center servers and the workstations on our desks. Daily, we'd log into wookie from elrond to check the backups from batman the night before. Long gone are those days not only in corporate, but even in my own home lab. I have 150+ entries in my DNS server and all hostnames are utilitarian in nature because there's just too much to keep up with. While it might not be as much fun to log into smt, rmt, susemgr, sles12sp4, dnsmasq, bkpsrv, and hpvm4 its a hell of a lot easier than when I was younger and had fewer boxes.
There is one notable exception: belanna.
My first unix server was a comically heavy HP 9000/755 workstation - with those enormous full height SCSI drives which was reminiscent of turbofans found on large, military transports during initial power-on. I don't know why I settled on B'Elanna as my first server name, but soon a slew of Sun Solaris boxes surrounded her; kes, sesksa, janeway, and 7of9 (yes, even after all this time I remember them all fondly; SPARCstation 5, SPARCstation 10, ULTRASparc 60, and an EnterpriseSPARC 250). doctor was my first IRIX box, an Indigo 2 I no longer have, and the Indy sitting adjacent me as I author this, has inherited its namesake.
At some point I grew weary of lugging around that ridiculously heavy 755/125 with its special HIL-keyboard and mouse and awkward sync-on-green coax-connect monitor - and traded it in on a beautifully light and functional HP 9000 712/80. It was impressively quick given its age when it was running 10.20, much less so when running 11.0. I was like a madman with the upgrades stuffing a 10k RPM drive in its minuscule chassis and maxing out its RAM. The fact that it could use a standard PS/2 keyboard and mouse and regular VGA monitor gave a whole new meaning to the word, "portable." This was belanna for many more years.
I wish I had kept all my pizza box form-factors, I do. I have so few regrets in my life, and that is one of them. I had amassed so many 64-bit boxes, we'd decided to ditch every 32-bit machine we had. Later (and I don't remember the exact circumstances in which Mr. Ernest Cody suggested I take home a couple of rx2600's he'd acquired), belanna evolved to Itanium and has been running on and off ever since, and what a workhorse she's been! I used her to teach myself IVM (Itanium Virtual Machine - later HP Virtual Machine), Service Guard clustering, and have pressed her into service every time we've had an immediate need at work for an HP/UX machine (you may be surprised how often that happens, even now). And this is why every login, and every hpvm carries the notation, "HEC Foundation."
She's down a bank of RAM these days, and HPVMs disallow her from unlocking her hyper-threaded cores, but she's currently running four 11iv3 hpvms for training purposes, and I couldn't be more proud of her.

The LAB is back up after an exhausting day!
r710/bkp CentOS 8.5 to Centos Stream 8
r730/SAN FreeNAS to TrueNAS; SAS drive replaced
i5/NAS unRAID back online
rx2600 HP/UX 11iv3 up and running
SGI Indy IRIX 6.5 up and running
r610/mc upgraded from 40GB to 48GB of RAM
r610/ESXi upgraded from 48GB to 96GB of RAM
VMs up smt/rmt/susemgr
qnetd
openbsd
nomachine
SAP Cluster Node 1/2/3 <— upgraded to SLES15SP3
VMware Fusion all VMs updated to latest Fusion firmware
RPi4/ESXpi …Still kinda flaky
Tomorrow, installation of SAPGUI on macOS.
But now? WORLD OF WARSHIPS LEGENDS on XBOX :D
#iamthecloud

◾ Tags:

So this was a lot easier than trying to figure out how to get an XDMCP login propmt on the new flavors of linux login screen:
On the SGI box Toolchest --> System --> Utilities --> Enable Remote Display
Then on the linux host, in a console window (choose one):
Finally run this command:
Xnest -query host_to_connect -geometry 1280x1024 :1
On the SGI box Toolchest --> System --> Utilities --> Enable Remote Display
Then on the linux host, in a console window (choose one):
yum install xnest
zypper install xnest
apt install xnest
Finally run this command:
Xnest -query host_to_connect -geometry 1280x1024 :1
Because "stty erase [backspace]" doesn't work in Irix like it does in HP/UX & Solaris:
FYI, you have to be in bash shell for this to work.


So the easiest thing to do was set the linux access terminal:
Edit --> Profile --> Edit --> Compatibility --> Backspace key generates "Control-H"
stty intr \^C erase \^? kill \^U
FYI, you have to be in bash shell for this to work.
So the easiest thing to do was set the linux access terminal:
Edit --> Profile --> Edit --> Compatibility --> Backspace key generates "Control-H"
for x in `cat hostnames`;
do echo $(nslookup $x | grep -e Address | sed -n 2p | sed -r 's/.{9}//') $x ;
done >> hostfile
Or, add SHORTNAME and ALIAS:
for x in `cat hostnames`;
do echo $(nslookup $x | grep -e Address | sed -n 2p | sed -r 's/.{9}//') $x $(echo $x | sed "s/\..*//") $(echo $x | sed "s/\..*//").alt.fqdn;
done >> hostfile
Script which is meant to run from a directory containing compressed/encapsulated EMCgrabs either from ESX or linux hosts.
#
Removes hostnames (retains domain).
Removes up to three (3) IPs.
Handles those god-awful filenames which contain spaces.
Re-compresses new tarball(s) sans hostname for transmission.
#
sanitize_emcgrab_runme.sh
sanitize_emcgrab_data.sh
scripts]$ cat vxcreate1
x=0
while [ $x = 0 ]
do
clear
echo "Initialize all Veritas disks press 1"
echo "Create a vg and extend disks into it press 2"
echo "Create specific sized LV on specific disks and format press 3"
echo "Press 6 to exit"
read input1
case "$input1" in
1)
> vxcreate.out
vxdisk list
vxdisk list | grep -i emc-vplex1_ |awk '{print $1}' > vxcreate.out
for i in `cat vxcreate.out`
do
/etc/vx/bin/vxdisksetup -i $I
# if adding single-disk, just /etc/vx/bin/vxdisksetup -I sde (no /dev, for example)
done
;;
2)
./stuff.pl
echo "Enter VG name"
read VGname
echo "Enter disk"
read disk0
echo "Enter Disk Name"
read disk1
vxdg init $VGname $disk1=$disk0
# if adding single-disk, just vxdg init vgDISK4 sde=sde (for example)
# vxprint -htg vgDISK4 (helpful command to identify size): bold, italics below
#
# dm sde sde auto 65536 978688 -
w=0
while [ $w = 0 ]
do
echo "Would you like to add another disk to the VG?"
read stuff1
case "$stuff1" in
y)
#echo "Enter VG name"
#read VGname
echo "The VG name is $VGname"
echo "Enter disk"
read disk0
echo "Enter Disk Name"
read disk1
vxdg -g $VGname adddisk $disk1=$disk0
;;
n)
w=1
;;
*)
echo "Invalid Choice"
sleep 1
;;
esac
done
;;
3)
vxdisk list
echo "Enter VG name"
read VGname
echo "Enter LV name"
read LVname
vxdg -g $VGname free
echo "Enter LV size as 10G or in blocks"
read LVsize
echo "Enter the disk"
read Disk
vxassist -g $VGname make $LVname $LVsize $Disk (use size from above)
/usr/lib/fs/vxfs/mkfs -t vxfs -o largefiles,bsize=8192 /dev/vx/rdsk/$VGname/$LVname
echo "Enter the Mount Point"
read mountp
echo "/dev/vx/dsk/$VGname/$LVname $mountp vxfs defaults,_netdev 0 0" >> /etc/fstab
mkdir $mountp
mount $mountp
;;
6)
echo exit
x=1
;;
*)
clear
echo "not a valid option"
sleep 2
;;
esac
done
scripts]$ cat vxcreate1
x=0
while [ $x = 0 ]
do
clear
echo "Initialize all Veritas disks press 1"
echo "Create a vg and extend disks into it press 2"
echo "Create specific sized LV on specific disks and format press 3"
echo "Press 6 to exit"
read input1
case "$input1" in
1)
> vxcreate.out
vxdisk list
vxdisk list | grep -i emc-vplex1_ |awk '{print $1}' > vxcreate.out
for i in `cat vxcreate.out`
do
/etc/vx/bin/vxdisksetup -i $i
done
;;
2)
./stuff.pl
echo "Enter VG name"
read VGname
echo "Enter disk"
read disk0
echo "Enter Disk Name"
read disk1
vxdg init $VGname $disk1=$disk0
w=0
while [ $w = 0 ]
do
echo "Would you like to add another disk to the VG?"
read stuff1
case "$stuff1" in
y)
#echo "Enter VG name"
#read VGname
echo "The VG name is $VGname"
echo "Enter disk"
read disk0
echo "Enter Disk Name"
read disk1
vxdg -g $VGname adddisk $disk1=$disk0
;;
n)
w=1
;;
*)
echo "Invalid Choice"
sleep 1
;;
esac
done
;;
3)
vxdisk list
echo "Enter VG name"
read VGname
echo "Enter LV name"
read LVname
vxdg -g $VGname free
echo "Enter LV size as 10G or in blocks"
read LVsize
echo "Enter the disk"
read Disk
vxassist -g $VGname make $LVname $LVsize $Disk
/usr/lib/fs/vxfs/mkfs -t vxfs -o largefiles,bsize=8192 /dev/vx/rdsk/$VGname/$LVname
echo "Enter the Mount Point"
read mountp
echo "/dev/vx/dsk/$VGname/$LVname $mountp vxfs defaults,_netdev 0 0" >> /etc/fstab
mkdir $mountp
mount $mountp
;;
6)
echo exit
x=1
;;
*)
clear
echo "not a valid option"
sleep 2
;;
esac
done

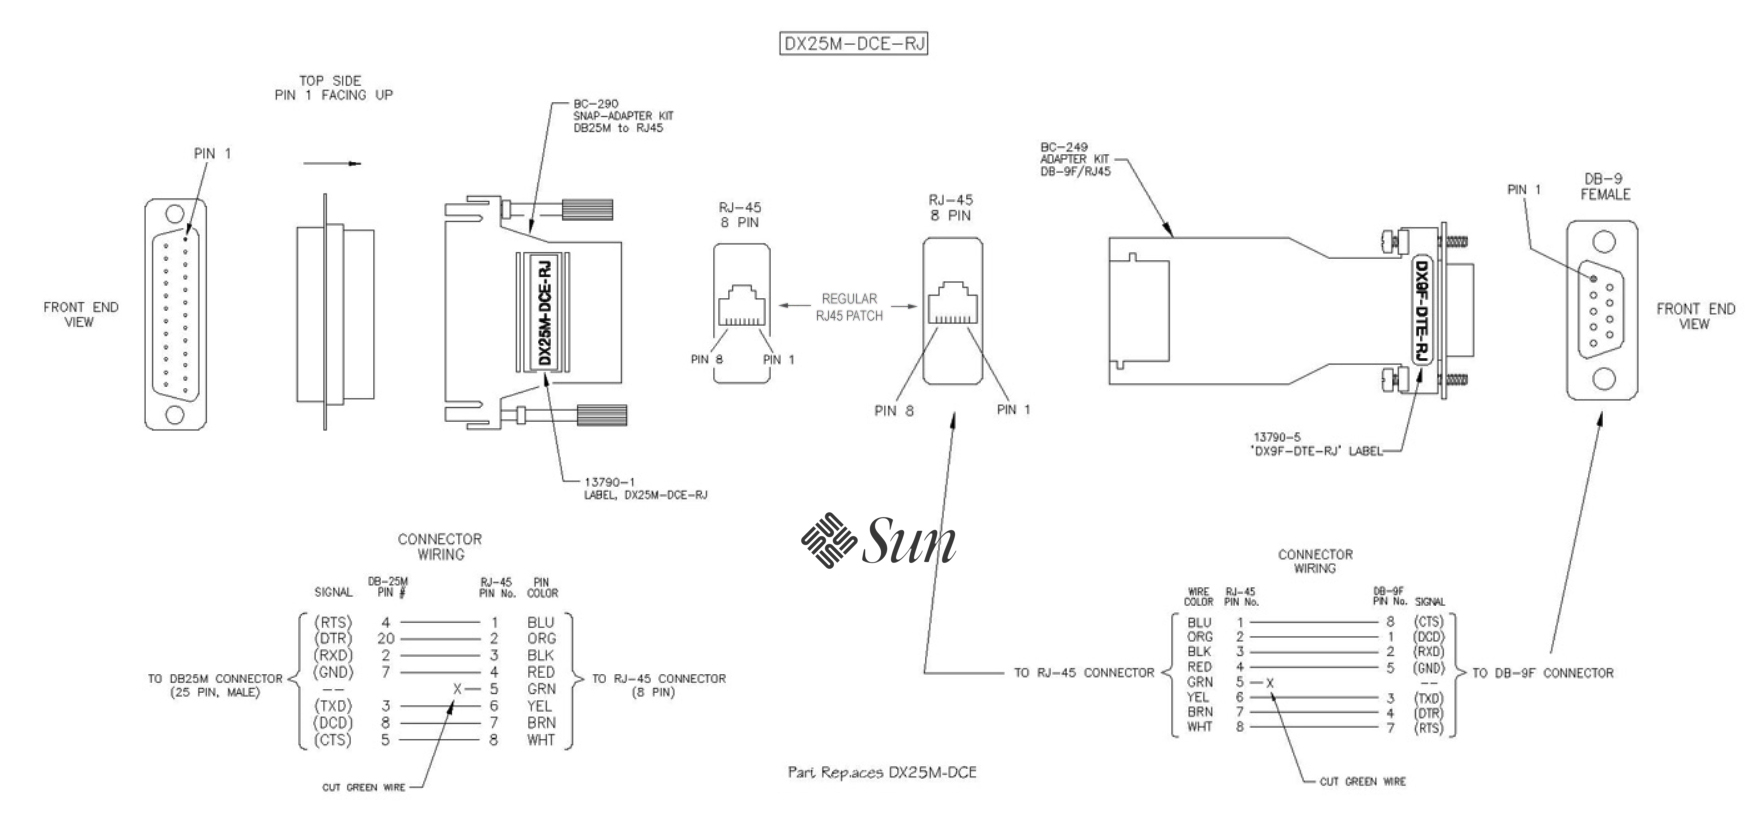
The pinout which worked for me to create a serial console connection between my laptop utilizing a Sabrent USB-to-serial db9 adapter ($9 on Amazon, or $30 goddamn bucks at your local tiny-town computer store), a straight-through RJ45 patch-cable, and two configurable connectors.
Godspeed.
The pinout which worked for me to create a serial console connection between my laptop utilizing a Sabrent USB-to-serial db9 adapter ($9 on Amazon, or $30 goddamn bucks at your local tiny-town computer store), a straight-through RJ45 patch-cable, and two configurable connectors.
Godspeed.
                    'c.          ehowton@Mac-mini.local
                 ,xNMM.          ----------------------
               .OMMMMo           OS: macOS Catalina 10.15.5 19F101 x86_64
               OMMM0,            Host: Macmini8,1
     .;loddo:' loolloddol;.      Kernel: 19.5.0
   cKMMMMMMMMMMNWMMMMMMMMMM0:    Uptime: 1 day, 21 hours, 51 mins
 .KMMMMMMMMMMMMMMMMMMMMMMMWd.    Packages: 34 (brew)
 XMMMMMMMMMMMMMMMMMMMMMMMX.      Shell: zsh 5.7.1
;MMMMMMMMMMMMMMMMMMMMMMMM:       Resolution: 1920x1080
:MMMMMMMMMMMMMMMMMMMMMMMM:       DE: Aqua
.MMMMMMMMMMMMMMMMMMMMMMMMX.      WM: Quartz Compositor
 kMMMMMMMMMMMMMMMMMMMMMMMMWd.    WM Theme: Blue (Light)
 .XMMMMMMMMMMMMMMMMMMMMMMMMMMk   Terminal: /dev/ttys000
  .XMMMMMMMMMMMMMMMMMMMMMMMMK.   CPU: Intel i7-8700B (12) @ 3.20GHz
    kMMMMMMMMMMMMMMMMMMMMMMd     GPU: Intel UHD Graphics 630
     ;KMMMMMMMWXXWMMMMMMMk.      Memory: 19824MiB / 65536MiB
       .cooc,.    .,coo:.
% hdiutil attach -nomount Instalation_Tools_and_Overlays1.img
/dev/disk2
% hdiutil create IRIX_6.5.30-InstallationTools_and_Overlay1.dmg -srcdevice /dev/disk2
Preparing imaging engine…
Reading whole disk (unknown partition : 0)…
............................................................................................................................
(CRC32 $14E70CD2: whole disk (unknown partition : 0))
Adding resources…
.............................................................................................................................
Elapsed Time: 2.509s
File size: 381197818 bytes, Checksum: CRC32 $96FA2505
Sectors processed: 1018592, 1018592 compressed
Speed: 198.2Mbytes/sec
Savings: 26.9%
created: /Users/ehowton/Desktop/IRIX_6.5.30-InstallationTools_and_Overlay1.dmg
Right-click --> Burn Disk Image

Its been years since I fired up an SGI and that was when I installed an Indigo 2 and never used it again. The manual package selection and dependency resolution was insane. But somehow this little Indy seems lighter. And faster.
I found a year-old post on the Vintage Computer Facebook group I belong to and reached out as he was interested in selling them. Much to my surprise, he still had them a full year after advertising them, and I agreed to pick them up. In Saint Louis. It just so happened he was coming to KC in a couple of weeks and would bring them with him, halving my 16-hour round trip drive to just eight. The game was afoot!
He arrived in a freaking Astin Martin (black sports car, he'd texted when he arrived at the predetermined spot lol). I got a working Indy, a non-working Indy, and a half populated Challenge (server version of the Indy workstation). I'd already been researching SCSI-to-SSD configurations and was pleasantly surprised to find people were booting their SGIs with SD cards from a SCSI add-in. Thing is, my Raspberry Pi boots from SD, and while unremarkable, not sexy. Of course many of the so-called solutions were just under $80, and that seemed steep for a 100Mhz processor on a 30-year old machine. But I did find a 50-pin "fast" SCSI-to-SAS adapter. And SATA can fit on SAS, its just runs at an amazeballs 6GB/sec instead of the SAS's amazeballs 12GB/s but again, we're talking 40MB/sec fast-SCSI. And SATA SSDs are cheap. And if it didn't work I could always put a 15k SAS drive in there. And the adapter was only $4. HELL YEAH.
So I spent overnmight and most of the day configuring it, playing with it, admiring it, and of course manually resolving all those goddamn software dependencies. But its the most fun I've had with an O/S in a long time. And my 64GB Memory Core i7 Mac Mini arrives tomorrow. I think I'll place it atop the Indy :)
Its been years since I fired up an SGI and that was when I installed an Indigo 2 and never used it again. The manual package selection and dependency resolution was insane. But somehow this little Indy seems lighter. And faster.
I found a year-old post on the Vintage Computer Facebook group I belong to and reached out as he was interested in selling them. Much to my surprise, he still had them a full year after advertising them, and I agreed to pick them up. In Saint Louis. It just so happened he was coming to KC in a couple of weeks and would bring them with him, halving my 16-hour round trip drive to just eight. The game was afoot!
He arrived in a freaking Astin Martin (black sports car, he'd texted when he arrived at the predetermined spot. I got a working Indy, a non-working Indy, and a half populated Challenge (server version of the Indy workstation). I'd already been researching SCSI-to-SSD configurations and was pleasantly surprised to find people were booting their SGIs with SD cards from a SCSI add-in. Thing is, my Raspberry Pi boots from SD, and while unremarkable, not sexy. Of course many of the so-called solutions were just under $80, and that seemed steep for a 100Mhz processor on a 30-year old machine. But I did find a 50-pin "fast" SCSI-to-SAS adapter. And SATA can fit on SAS, its just runs at an amazeballs 6GB/sec instead of the SAS's amazeballs 12GB/s but again, we're talking 40MB/sec fast-SCSI. And SATA SSDs are cheap. And if it didn't work I could always put a 15k SAS drive in there. And the adapter was only $4. HELL YEAH.
So I spent overnmight and most of the day configuring it, playing with it, admiring it, and of course manually resolving all those goddamn software dependencies. But its the most fun I've had with an O/S in a long time. And my 64GB Memory Core i7 Mac Mini arrives tomorrow. I think I'll place it atop the Indy :)
# zypper install go git
# apt install golang-go git
# go get -u github.com/sophaskins/efs2tar
# export GOPATH=$HOME/go
# export GOBIN=$HOME/go/bin
# cd $HOME/Downloads/github.com/sophaskins/efs2tar
# go install main.go
# go run main.go -in SGI_efs.iso -out SGI_file_tarball.tar
This was actually required to utilize efs2tar, which is a utility which allows an SGI "efs" file-system CDROM to be turned into a tarball for later exploitation since you can't mount an ISO on Irix and nothing else can mount it either, except Irix, with a SCSI CDROM drive.
Also? wget -e robots=off to pull down entire tardift repositories which have a robots.txt wget bot blocker. This is a beautiful thing.
wget -e robots=off \
--recursive \
--no-clobber \
--page-requisites \
--html-extension \
--convert-links \
--restrict-file-names=windows \
--domains site.you.gonna.rip \
--no-parent \
http://site.you.gonna.rip/path/to/repositories/
For reasons I won't go into here, I increased the capacity of an iSCSI LUN to make more room in a handful of logical volumes. Awkwardly, the parent volume group lost its goddamn mind.
I can't recall if I've ever run into this specific scenario or not before, but I doubt it because I rarely mess around with SAN. Well, until recently anyway. Suffice it to say I was stuck until I could find away to dynamically resize the volume group. Turns out you have to use pvresize as in:
pvresize /dev/sdb
I cannot remember now if I had activated or deactivated the vg prior to doing so, but at any rate it worked.
Either I was always searching for the wrong words or combination of words on Google - OR - the information is so humiliatingly basic as to not be helpful to anyone who already understands SAN topology, I present to you this, my masterpiece of trial and error (basically clinking every goddamn thing I could, in every conceivable combination until something worked.) Also, I'm the only person on the planet not running vCenter which makes it look like it could be configured verbally, "Alexa, map my SAN LUNs to ESXi."
"No problem, Eric. Done."
SO YOU WANT TO ADD SAN DISKS TO YOUR ESXi HOST LOL
ESXi HOST - ESXi 6.7u3:
12x48 PowerEdge R610 with a single 16GB dual-port HBA
SAN HOST - FreeNAS 11.3u2:
32x16 PowerEdge R730 with a single 10GB quad-port HBA
In FreeNAS ensure:
Sharing --> Block Shares (iSCSI) --> Associated Targets
Contains the Target/Extent mapping you wish to use, else even with the above the VM will not be able to see the boot disk.
Sharing --> Block Shares (iSCSI) --> Extents
For ESXi ONLY ensure 512 block size and DISABLE physical block-size reporting!
Lastly, your iSCSI disks may appear as NORMAL,DEGRADED on your ESXi GUI. This is due to there only being a single-path to your SAN disk.
In ESX ensure:
Host --> Manage --> Hardware --> PCI Devices --> "[brand] [speed] [port number] network connection" (this is your HBA)
Ensure Passthrough is DISABLED (enabling is apparently awesome if you want ONLY EVER A SINGLE VM to see the SAN via fiber not FCoE)
Reboot the whole entire goddamn ESXi host if you had to toggle passthrough.
Storage --> Adapters --> (vmhbaXX - iSCSI software adapter - online - iscsi_vmk)
Highlight that bitch and whichever is not grayed out (Configure iSCSI or Software iSCSI) click that one.
You have to enter the SAN's copper network IP as a DYNAMIC TARGET (port should be pre-populated with 3260) and when you click {ok} or {next} or whichever verbiage indicates you've completed this task and should move on to the next...
STATIC TARGETS populate with the BLOCK SHARE TARGET NAMES from the SAN :O
We all have our philosophies surrounding system administration, and mine is learning by utilizing RTFM only as a last resort. According to the SUSE Linux Enterprise Server 15 SP1 Deployment Guide:
The boot manager GRUB 2, used to boot machines with a traditional BIOS, does not support UEFI, therefore GRUB 2 is replaced with GRUB 2 for EFI. If Secure Boot is enabled, YaST will automatically select GRUB 2 for EFI for installation.
I tried it both ways, but EFI with Secure Boot disabled seems to be the way to go.
Edit Settings --> Add Hard Disk --> New Raw Disk --> (compare hostname UUID mapping from FreeNAS)
Boot VM from attached optical media and it should jump right into Installation and know right where to install :)
WHEN YOU ADD ANOTHER PATH TO AN EXISTING ESXi:
Storage --> Adapters --> Rescan
Storage --> Devices --> Rescan
Storage --> Devices --> Refresh
Should populate with the new LUN IF THE LUN ON THE SAN SIDE has a unique LUN_ID.
Wow let's see, Thursday I spent all day building, populating, and learning how to use the new Registration Management Tool (RMT) the SLES15 replacement for their Subscription Management Tool (SMT), which I had planned on building one day, but necessity as they say is indeed the mother of invention; I couldn't move forward with out it.
I'd had some weird unix-troubleshooting dream that morning, awaking with a start and suddenly knowing how to install virtual machines directly from the SAN. Alexa informed my groggy ass it was three-hours earlier than I usually get up, so I shrugged on some shorts, grabbed a cup of coffee and starting working straightaway. As it turned out, that was the easy part.
Its not like you can google, "How come an ESXi SLES15 vm can install over FC-SAN but can't boot from it?" which was my day all day Friday. Well, actually you can ask but the answers are usually far too granular, far too vague, or some 12-year old thinks you're talking about double-clicking a Windows icon. As I had to work production maintenance this evening, I played around with it on and off some more. Admittedly, I know very little about fiber channel, very little about storage attached networks, and very little about hypervisor interactions with host bus adapters (and SLES15 seems just different enough from SLES12 to complicate these matter), so its not like I was expecting to get it right the first time. Or the second, for that matter.
In the midst of all this I'm still teaching my wife unix, I've picked up another student of sorts, and have worked something like 12-days straight, 70-hours this week alone. And I haven't been able to play Dungeon Siege in two days :(
For a rambling, disjointed list of a mix of both related, and unrelated reasons, I decided to play Dungeon Siege.
Found my DSII hardpack of discs, but not my DSI install disc. Its somewhere in the house. Went through a dozen or so boxes, couldn't find it, bought it on Steam for $7. Discovered some bright, enterprising person or persons has made available an (enormous) HIGH-DEF skin for it. I go to download that and it requires the first Expansion Pack, Legends of Aranna, which I also have somewhere in this house. I find the first install disc for the Expansion Pack in my DSII hardpack and can only assume the second install/play disc is in the DSI case - the one I cannot find. But! Knowing myself so very well, I pull out my trusty aged external with all my game ISOs on it, because I know I made backups of every physical media I own for times exactly like this. Including, of course the game I just bought on Steam for $7. Not quite as smart as I think I am as it turns out.
AT ANY RATE I have a mix of ISO and UIF on my backup drive and ye olde standby MagicISO stopped working on Windows awhile back so I look up how to convert UIF-to-ISO and apparently there's a tiny installable app named (oddly enough) UIF-to-ISO and it looks eerily familiar, so I bring up the Window search bar and sure enough it is already installed on my system, so yay, but apparently I also only have the first Expansion Pack disc as an UIF (now ISO) and not the SECOND disk. WTF is even wrong with me?
Clicked the VPN button in the address bar of Opera on my linux workstation and I'm suddenly sipping vodka in the Ukraine. I torrent (I know, I know) a cracked verison (its not like I already don't own this game twice) and pull down...three (3) disks??? All in *.mdf format. Thankfully I already have iat on a beefy box I made to convert SGI disk label *.img files (not that that worked):
root@beefy:/xfer/ds_loa/Disks# iat DISK1.mdf DISK1.iso
Iso9660 Analyzer Tool v0.1.3 by Salvatore Santagati
Licensed under GPL v2 or later

Detect Signature RAW at 2440
Detect Signature RAW at 4888
Detect Signature RAW at 7336
Detect Signature RAW at 9784
Detect Signature RAW at 12232
Detect Signature RAW at 14680
Detect Signature RAW at 17128
Detect Signature RAW at 19576
Detect Signature RAW at 22024
Detect Signature RAW at 24472
Detect Signature RAW at 26920
Detect Signature RAW at 29368
Detect Signature RAW at 31816
Detect Signature RAW at 34264
Detect Signature RAW at 36712
Detect Signature RAW at 39160
Detect Signature ISO9660 START at 39184
Detect Signature RAW at 41608
Detect Signature ISO9660 END at 41632

 Image offset start at 0
 Sector header 16 bit
 Sector ECC 384 bit
 Block 2448
 29% [:=====>               :]
Each ISO took under 60-seconds to create (beefy) and 20-seconds each to pull over to my Windows box using scp. The enormous HIGH-DEF mod-pack was behind one of those throttling sites unless you pay a fee, so I'll include that on my external with the ISOs when I decide to do this again in 10-years booting from Microsoft Windows CloudTM
At any rate, the game looks FANTASTIC at 1920x1080. I can't even imagine how much work had to go into that, but it looks fresh and nothing like the 2002 it looked like when I started.

https://www.wsgf.org/dr/dungeon-siege --> For more resolutions (ex.: 3440 x 1440. Have to HEXEDIT the .EXE file)
https://www.nexusmods.com/dungeonsiege1/mods/44?tab=files --> High resolution texture pack (5.7Gib)
https://www.pcgamingwiki.com/wiki/Glossary:Anisotropic_filtering_(AF) --> Force anisotropic filtering
https://www.moddb.com/games/dungeon-siege/addons/dungeon-siege-high-resolution-textures <-- Skip the paywall above (Thanks Leslie!)
Last night was a bit of an impromptu lesson, and as it wasn't as planned, we touched on a handful of topics in a more stream-of-consciousness manner. Expounding more on the power of grep (where we left off the night before), that led us to regex and the disparate parts which encapsulate (g/re/p), which pointed us directly to a very high overview of sed all of which was followed up with a handful of practical applications and quizzes, which she either got correct, or anticipated the case-use scenarios on her own and asked if it could be used in the very way with which I was going to try and sneak in a trick question. Its humbling having such a smart wife. In fact, after each of my little mini-lessons, she went about things in such a different manner than I usually do, I was having a difficult time keeping up with HER. She seems to have taken the proverbial ball (thanks,
Last night she installed CentOS in preparation for an Introduction to Red Hat course :O
Somebody else is going to have to teach her subnetting though. That's what I failed on my HP/UX 11i Certification test (the fact that subnetting was fully three-goddamn-quarters of the cert test to this day remain beyond my comprehension, like WITAF?)
◾ Tags:
Today we started with a lesson in the three remaining major linux distros and their derivatives:
- RHEL
- Centos
- Fedora
- Debian
- Ubuntu
- Mint
- SLES
- openSUSE
And how they differed in their package managers (RPM & DPKG) and their online package repositories (yum, apt, and zypper). From there we updated her packages, rebooted (because there was a kernel update, which allowed us to talk about the kernel, and more on the shell), and she installed her first program, neofetch which gave us the opportunity to discuss, architecture, uptime, uname, (kernel) and /etc/*release*.
After that we started simply with more, head, tail as a follow-on to the cat command, which led us to pipe (|) and grep then went right into absolute versus relative paths, and surprisingly enough, file ownership and permissions, which she picked up way faster than I expected. I'm just pleasantly surprised at how quickly she's figuring out and running with the little information I give her :)
◾ Tags:
2005-2020
Back in the early days of LJ I'd created a BSD avatar for those few, painful times I ran FreeBSD. Wasn't really a fan, preferring instead the burgeoning liunx. One of the few ways to keep personalized avatars from resetting to the default in LJ is to keep the same name as the one it is replacing, then simply adding a comma deliminated keyword for search purposes. But I digress. My keyword-named "BSD" avatar was replaced with my O/S of choice back then of early ubuntu, and my avatar was a play on those ridiculous naked people gracing the wallpaper screen with the ubuntu logo prominently displayed somewhere on them. I wanted to make one better than the wallpapers, so turned to one of the nude models I was familiar with back in 06, and popped the logo the only place that made sense given both the logo, and the constraints of a 100x100 pixel avatar. Some time later, I thought it might look better as a tattoo, and updated it before using the same model when I switched operating systems to suse, then deciding several years later I'd done a slipshod job on the "tattoo" and made it more realistic, which is the one I use to this day.
Having gotten back into BSD, I decided I finally needed a BSD avatar to differentiate between the two given my rash of technical posts, especially since I already have one for Sun Microsystems, HP/UX, and SGI. I run a lot more OpenBSD these days than FreeBSD (though my SAN, FreeNAS is FreeBSD based), but "Puffy" the bloated OpenBSD logo is considerably less sexy than the new Anton K. Gural logo (not the Lasseter (of Pixar fame) daemon). Which I hued pink to match the hair of the new girl I found online and who's origin I cannot ascertain to give credit.
Admittedly, its been awhile since I've played with LJ avatars, but given two of my favorite subjects, still a hell of a lot of fun :)
Set up the NFS share Maproot user to "root" and the Maproot Group to "wheel"
This way when you have the NFS share mounted and you run something as root on the client you are also root on the FreeNAS box and can change the ownership of the directory.
# chmod 1777 /nfsmount <-- rwx +sticky bit
               ,        ,
              /(        )`
              \ \___   / |
              /- _  `-/  '
             (/\/ \ \   /\
             / /   | `    \
             O O   ) /    |
             `-^--'`<     '
            (_.)  _  )   /
             `.___/`    /
               `-----' /
  <----.     __ / __   \
  <----|====O)))==) \) /====
  <----'    `--' `.__,' \
               |        |
                \       /
           ______( (_  / \______
  (FL)   ,'  ,-----'   |        \
         `--{__________)        \/
Done! SAN-booted a diskless SLES 12 for SAP SP4 server over Fibre Channel! Handful of moving pieces here: First of all, I had to uncross the fibre cable I'd crossed - that wasn't working AT ALL. So, note to self, no matter fabric switch or direct connect, it doesn't need to be done. The two parts on FreeNAS which needed to be addressed was enabling the fibre port, and defining it as target, not an initiator, as indicated in TASKS and TUNABLES:
Type: Command
Command: ctladm port -o on -t fc
When: Post Init
Enable: checked
Variable: hint.isp.0.role
Value: 0
Type: Loader
Comment: target mode FC port 1
Enabled: checked
Many thanks to the HEC Foundation, Mr. Halsell, and the Steven J. Goodmark Memorial Library for their numerous contributions.
The video is the install-to-SAN from a thumbdrive boot pulling additional packages across the network from an SMT virtual.
https://www.ixsystems.com/community/resources/fibre-channel-on-freenas-11-1u4.93/
ME (a unix admin): "We need some unix-y music,"
HER: (with the quizzical look): "What is unix-y music?"
ME (obvs): PSY GOA TRANCE.
HER: ...
psy goa trance starts playing
HER (a connoisseur): "Oh, like Hackers!"
We closed the console and I had her log into the box remotely, via secure shell. Or at least, I tried. The username on the new openSUSE box did not match her username in the Mac Mini terminal, so it was then and there I decided we'd just jump right in. Awkwardly, I didn't realize at the time how overwhelming just changing a username would be for a novice.
This necessitated discussion and practical application on the following concepts as we stepped through each field of a password file:
Where usernames are kept on a unix system
How to ascertain where user passwords are located
What is a GID?
What/Where are user groups?
What goes in a comment field?
Home directories
Brief history of the shell and where to define it
Followed up with:
SysAdmin 101 - always copy a file you're going to edit prior to editing it
Why are we changing all these goddamn files for a single username?
Fuck mv, where is the unix rename command?
What is cat and how to use it after you've just edited a file you previously backed up.
And well before I was ready to even introduce it, but by sudden necessity, an introduction to vi. On the plus side, the gamer in her was able to quickly associate the vi navigation keys h, j, k, l with the w, a, s, d character movement keys in video games, something I'd not even ever considered.
She reminded me at the hour-mark that most classes gives breaks after 60-minutes of lecture and labs. Thankfully, we'd just completed our task.
◾ Tags: